
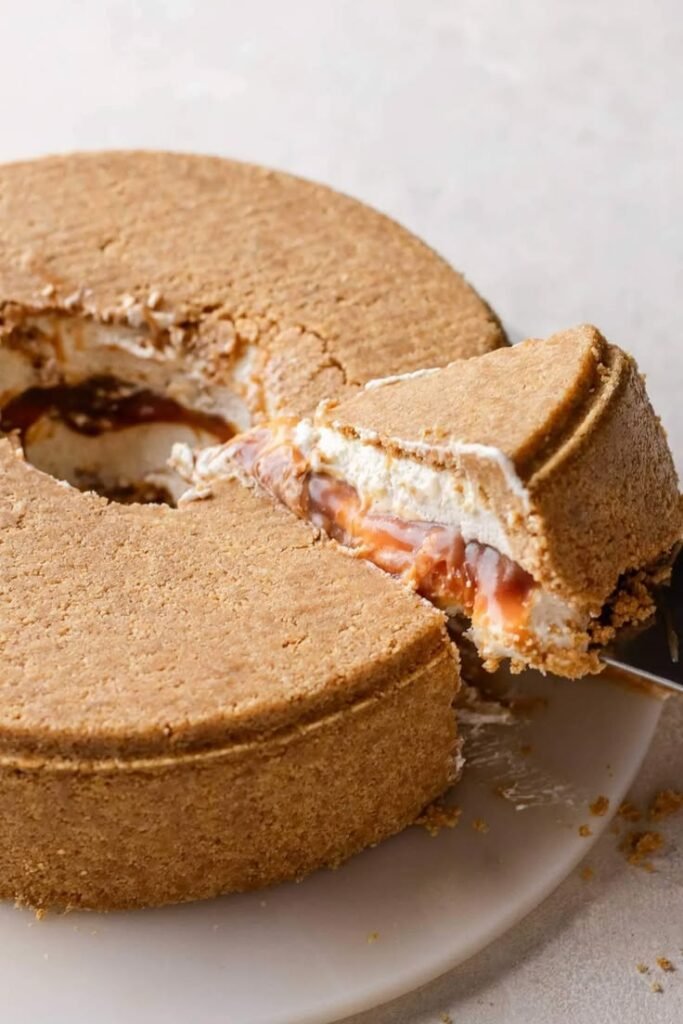
This dessert gives classic cheesecake a striking, indulgent twist. Beneath its polished surface is a smooth, rich filling with the familiar tang and gentle sweetness of cream cheese, while a glossy layer of golden salted caramel brings deeper flavor and a more dramatic finish. Each slice combines the comfort of a traditional baked cheesecake with the appeal of a confection worthy of a celebration, making it a natural centerpiece for a dinner party, holiday table, or special occasion.
The defining feature is the upside-down method. The caramel is cooked first, then spread across the bottom of the pan before the cheesecake filling is added. As the cake bakes and cools, the topping settles into a rich, sticky layer. Once the chilled cheesecake is carefully unmolded, the caramel that began underneath is revealed on top, flowing over the surface and sometimes slipping down the sides. This simple reversal creates its signature look without requiring elaborate decoration or extra finishing work.
Flavor and texture are equally important to the dessert’s appeal. The filling is dense yet creamy, with a tender, velvety feel that contrasts with the caramel’s supple, glossy coating. Sugar brings warmth and sweetness, while a measured amount of salt sharpens the caramel’s buttery notes and keeps the overall taste from becoming one-dimensional. The result is rich but balanced: sweet, creamy, and lightly savory in every bite. Expect a smooth, clean slice beneath an amber sheen, with a topping that catches the light and adds a pleasingly soft, slightly tacky finish. Served chilled, this cheesecake feels luxurious without losing the familiar character that makes cheesecake so appealing.
Full-fat cream cheese is the foundation of a rich, dense filling, so choose block-style cream cheese rather than a softer spread. Its higher fat content helps create the characteristic smooth, substantial texture of cheesecake. Granulated sugar sweetens the filling and supports a tender consistency, while eggs bind the mixture and help it set during baking. Add vanilla extract for warmth and aroma. Sour cream contributes a gentle tang and a softer, more delicate texture; heavy cream can be used instead when a richer, silkier filling is preferred. A small pinch of salt balances the sweetness and brings the buttery, toasted notes of salted caramel into sharper focus.
For the base, use finely crushed graham crackers or plain biscuits mixed with melted butter. The crumbs provide a crisp, lightly sweet contrast to the creamy filling, and the butter binds them into a compact crust. Press the mixture evenly across the pan’s bottom, using the base of a glass or measuring cup to create a firm layer. The caramel topping can be made with sugar, butter, and heavy cream, with salt added to taste. Cook the sugar until it reaches a deep amber color, then carefully incorporate the butter and cream for a smooth, glossy sauce. Avoid rushing this step: evenly melted sugar helps prevent a grainy texture.
Before mixing, bring the cream cheese, eggs, sour cream or cream, and other refrigerated ingredients to room temperature. Ingredients at a similar temperature blend more evenly, reducing lumps and the need for excessive mixing, which can introduce air and encourage cracks. Measure everything before you begin, and prepare the caramel ingredients in advance; caramel cooks quickly and requires close attention. Secure the springform pan to limit leaks, especially if using a water bath. Check that the base is locked in place, then wrap the outside with a few tight layers of heavy-duty foil, extending above the bottom seam. Set out the crust, filling, and topping ingredients in order so the assembly proceeds smoothly and baking can begin without interruption.
Begin by preparing the pan so the caramel can be added while it is still fluid. Melt sugar over medium heat in a heavy saucepan, stirring or gently swirling as it dissolves. Once it turns a clear golden amber, add butter carefully; the mixture will bubble vigorously. Stir until smooth, then slowly pour in cream and continue stirring until the sauce is glossy and unified. Remove the pan from the heat and mix in salt. Let the caramel settle briefly, then pour it into the prepared cake pan and tilt the pan to coat the base in an even layer. Avoid letting it cool for too long, as it will thicken and become harder to spread.
Prepare the crust while the caramel firms. Combine the crumbs with melted butter until the texture resembles damp sand, then scatter the mixture over the caramel. Press it into a compact, level layer using the bottom of a glass or measuring cup, taking care not to disturb the caramel beneath. A firmly packed crust is less likely to crumble when the finished cheesecake is turned out.
For the filling, bring the cream cheese and other chilled components to room temperature so they blend smoothly. Beat the cream cheese until soft, then add the remaining filling ingredients gradually, mixing on low speed and scraping the bowl as needed. Stop once the mixture is smooth; prolonged or vigorous beating incorporates excess air, which can cause the cheesecake to rise, sink, or crack. Pour the filling gently over the crust and smooth the surface.
Bake at a moderate temperature, protecting the delicate filling from abrupt heat and drying. A water bath is an effective option: wrap the pan securely, set it in a larger roasting pan, and add hot water around it. Alternatively, place a pan of hot water on the lower oven rack to create moisture without immersing the cheesecake pan. Bake until the outer edge looks set while the center retains a slight, unified wobble when the pan is nudged. The middle should not appear liquid. Allow the cheesecake to cool gradually before chilling, helping the filling set and reducing stress that may lead to cracks.
Once the cheesecake is baked, turn off the oven and leave the door slightly ajar for about an hour. This gradual cooling helps the center finish setting while limiting the sudden temperature change that can cause cracks or a sunken surface. Transfer the pan to a wire rack and let it cool completely to room temperature, keeping it away from drafts. Do not rush this step by placing a warm cheesecake directly in the refrigerator; condensation and uneven cooling can affect its texture.
When fully cool, cover the pan and refrigerate the cheesecake for at least six hours, preferably overnight. Thorough chilling firms the filling and allows the caramel layer to settle, making the cake easier to unmold and cut cleanly. Before releasing the springform ring, run a thin, warm knife around the inside edge, wiping it between passes. Open the clasp slowly, then lift the ring straight up without pulling against the crust.
Set a serving plate over the cheesecake, hold both securely, and invert them in one controlled motion. Lift off the pan base and parchment carefully so the glossy caramel becomes the crown. If caramel clings to the base, warm the metal briefly with a warm, damp towel, then ease it away; spoon any loosened sauce over the top. If the caramel flows toward the plate, chill the cake again briefly and catch excess sauce to serve alongside.
Serve the cheesecake chilled for the firmest slices, or let it stand at room temperature for 15 to 20 minutes for a softer, creamier bite. Finish with flaky salt, whipped cream, or toasted nuts if desired. Refrigerate leftovers in an airtight container for up to five days. For longer storage, freeze portions or the whole cake, well wrapped, for up to one month; thaw overnight in the refrigerator, since repeated thawing can damage the texture. For neat slices, dip a long sharp knife in hot water, wipe it completely dry, and repeat between each cut.