
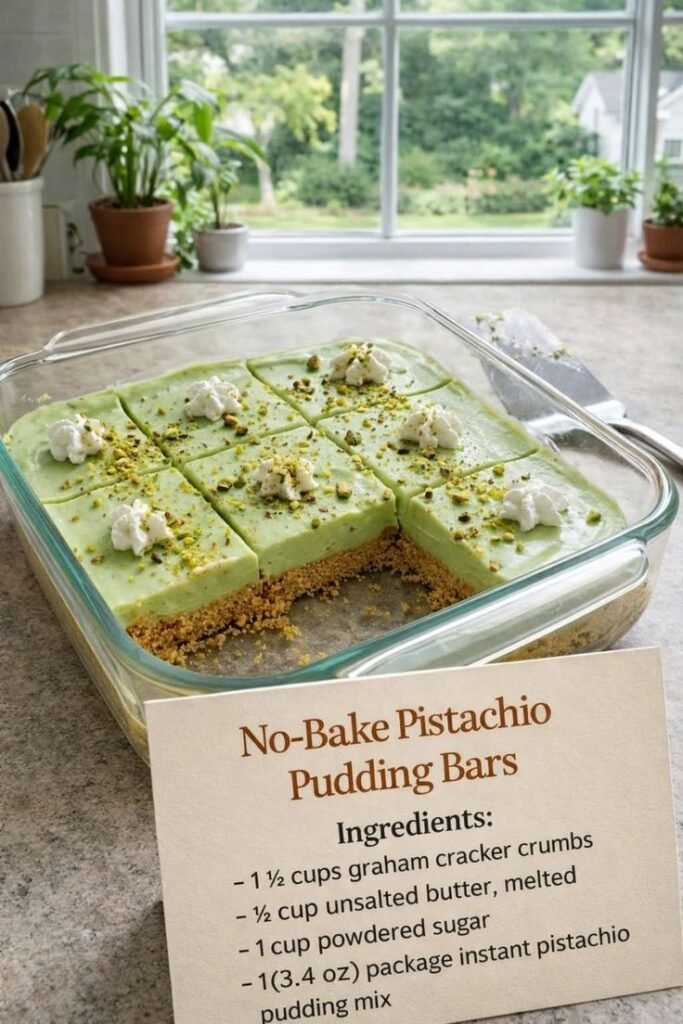
These no-bake pistachio bars bring together the appealing flavors and textures of a homemade dessert without requiring an oven or complicated techniques. A crisp, buttery base provides a sturdy contrast to the smooth filling, while pistachio gives each bite a gently nutty character. The sweetness stays pleasant rather than overwhelming, allowing the distinctive flavor of the nuts to remain at the center. Because the layers are simple to assemble and chill, the recipe is approachable even for cooks who are new to making desserts from scratch.
The ingredients are familiar and easy to find, and preparation mainly involves mixing, pressing, and chilling. That makes these bars especially useful on warm days when turning on the oven is less appealing, or when a dessert needs to be made without much last-minute effort. Once assembled, the pan can be refrigerated until the filling is firm, so the bars are convenient to prepare ahead for a gathering, a family meal, or an afternoon treat. Chilling also helps the base hold together and gives the creamy layer time to set into neat, sliceable portions.
Each square offers a satisfying balance: a buttery crunch underneath, a silky pistachio-rich center, and just enough sweetness to bring the flavors together. The recipe is also easy to personalize without changing its simple method. Sprinkle chopped pistachios over the top for extra crunch and a clear hint of the main ingredient, or drizzle on melted chocolate for a richer finish. A light scattering of either topping can make the bars feel suited to a special occasion while keeping them unfussy enough for everyday enjoyment. Served cold, they make a refreshing, make-ahead dessert that is both attractive and practical, with familiar ingredients transformed into something creamy, nutty, and easy to share.
Crushed biscuits or graham crackers provide structure and a pleasant contrast to the soft filling. Choose plain cookies and crush them finely so they press into an even layer; large pieces can make the bars crumble when sliced. Melted butter binds the crumbs. Add it gradually, mixing until the texture resembles damp sand and holds together when squeezed. Press the mixture firmly into a parchment-lined pan, paying attention to the corners. A flat-bottomed glass can help compact the base so it chills into a sturdy layer. Leave parchment overhanging the sides to lift the finished bars out cleanly.
Pistachio flavor can come from a ready-made pistachio spread, unsweetened pistachio paste, or finely ground nuts. Choose an ingredient with a fresh, distinctly nutty aroma, since products vary in both flavor and pistachio content. The filling’s creamy component—such as softened cream cheese, whipped cream, or a combination—creates its smooth texture. Bring refrigerated dairy ingredients to a workable temperature before mixing; cream cheese, in particular, blends more easily when softened. Powdered sugar sweetens the filling and dissolves smoothly, while a little vanilla rounds out the flavor. A small pinch of salt can sharpen the pistachio notes and balance sweetness.
Measure ingredients carefully to help the bars set cleanly and cut into even portions. The right proportions depend on the pistachio ingredient: sweetened spread contributes sugar and may be softer or looser than unsweetened paste, while ground pistachios add texture and absorb moisture differently. Adjustments to the amount of powdered sugar or creamy ingredients may therefore be needed to keep the filling firm yet silky. Avoid adding extra liquid without a corresponding change to the recipe, as this can prevent the bars from setting. Once assembled, chill the pan thoroughly before lifting out and slicing with a clean, sharp knife.
Begin by placing the biscuits in a sturdy bag and crushing them with a rolling pin until they form fine, even crumbs. Alternatively, pulse them briefly in a food processor, stopping to break up any larger pieces. Transfer the crumbs to a bowl, pour in the melted butter, and stir until evenly moistened. Line a square pan with parchment, leaving enough overhang to lift out the bars later. Tip in the mixture and press it into a compact, level layer using the bottom of a measuring cup. Chill the base while preparing the filling.
Beat or fold the chosen creamy ingredients in a bowl with the pistachio component, powdered sugar, and flavorings, following the recipe’s specified order. If using cream cheese, let it soften first so it blends smoothly without lumps. Add the pistachio paste or finely ground pistachios gradually, tasting as you go if adjustments are appropriate. When whipped cream is part of the filling, fold it in gently with a spatula rather than beating vigorously; overmixing can deflate the cream and make the texture less light. Stop as soon as the mixture looks smooth and evenly colored.
Remove the chilled biscuit base from the refrigerator and spoon the filling over it. Spread the mixture to the edges in an even layer, taking care not to disturb the crumbs underneath. Smooth the surface with an offset spatula or the back of a spoon. For extra texture or decoration, scatter chopped pistachios over the top, add a little chocolate, or finish with a light drizzle. Keep toppings modest so the creamy layer remains easy to portion and the pistachio flavor stays prominent.
Cover the pan and refrigerate the bars until the filling is fully firm. Chilling time varies with the ingredients and pan depth, so rely on texture rather than the clock alone: the center should hold its shape when lightly touched. To serve, use the parchment overhang to lift the slab onto a cutting board. Warm a sharp knife under hot water, wipe it dry, and cut straight down into bars. Clean and rewarm the blade between cuts for neat edges. Store the finished bars covered in the refrigerator.
Serve the bars well chilled so the creamy pistachio filling is firm and easy to slice. Use a sharp knife, wiping it clean between cuts for neat edges, and cut the bars into small portions. The filling is rich, so modest squares are satisfying and convenient to serve alongside coffee, tea, or fresh fruit. For the cleanest slices, let the bars sit at room temperature for only a few minutes before cutting, then return any uneaten portions to the refrigerator promptly.
There are several simple ways to vary the recipe. For a chocolate contrast, spread a thin layer of melted chocolate over the set filling and chill until firm before slicing. White chocolate can also be folded into the filling for extra sweetness, or melted and drizzled over the top. To make the base gluten-free, use gluten-free biscuits or cookies in place of regular biscuits, checking that the other ingredients meet your needs. Finish with toasted chopped pistachios, almonds, or another nut for added crunch; add the topping just before chilling so it adheres to the filling.
Store the bars in an airtight container in the refrigerator, where they are best enjoyed within several days for the freshest texture and flavor. If stacking portions, place parchment paper between the layers to prevent sticking. The bars can also be frozen: arrange them in a single layer in a freezer-safe container, or separate layers with parchment, and thaw portions in the refrigerator before serving. If the filling seems soft, chill the bars longer rather than trying to cut them early. Press the biscuit crust firmly and evenly into the pan to help prevent crumbling, and avoid adding excess liquid to the filling, which can keep it from setting and make the bars lose their shape.