
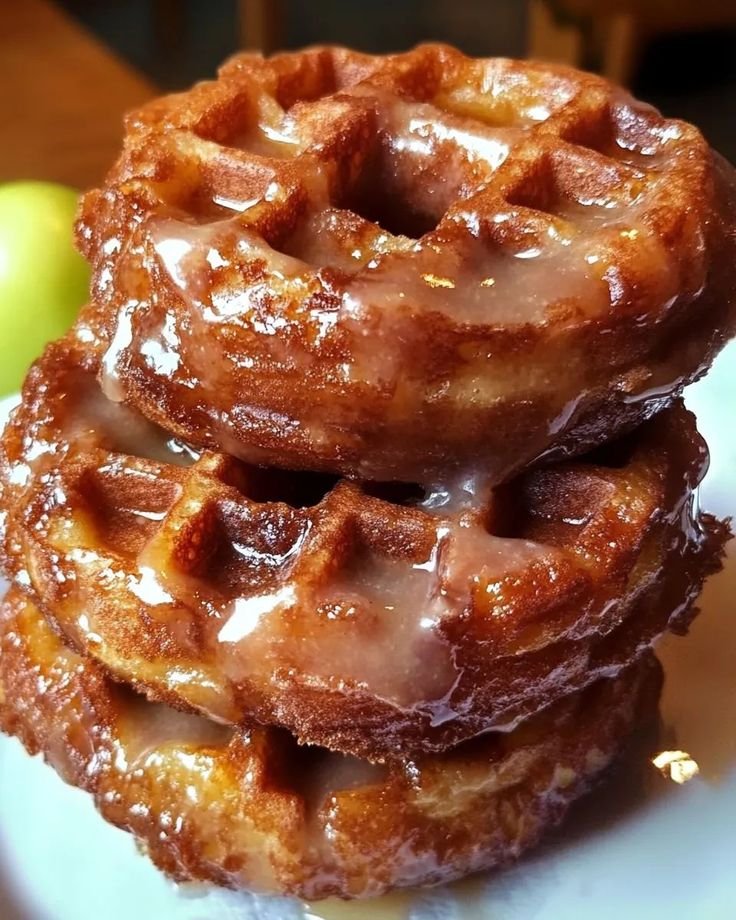
These apple fritter waffle donuts bring together the best parts of three familiar treats in one easy-to-make recipe. They have the sweet, warmly spiced character of an apple fritter, the crisp ridges of a waffle, and a light glaze reminiscent of a bakery-style donut. Rather than shaping dough or heating a pot of oil, you spoon a thick, apple-studded batter into a waffle iron. The result is a playful, comforting treat with plenty of homemade appeal.
The waffle iron gives each piece its distinctive ridged surface, helping the edges turn golden and crisp while the inside stays tender. Its even heat cooks the batter quickly, and the pockets and grooves create more browned edges in every bite. Since there is no deep-frying, the method avoids managing hot oil and makes cleanup simpler. The finished treats are waffle-shaped, not traditional ring donuts, but their sweet flavor and delicate glaze capture some of the same satisfying qualities.
Chopped apple adds juicy bits throughout, while cinnamon and other warm spices bring a familiar autumnal aroma that works any time of year. A simple drizzle of glaze adds sweetness without overwhelming the fruit or the lightly crisp exterior. Serve the waffle donuts warm for breakfast or brunch, or offer them as an easy dessert with coffee, tea, or a scoop of ice cream. The recipe is approachable for home cooks: the batter comes together with everyday ingredients, and the waffle iron does most of the cooking. You can make a batch without special donut pans, complicated shaping, or advanced baking skills. Expect a rustic, golden-brown treat rather than a perfectly uniform pastry; each waffle may have its own pattern, with crisp edges framing a soft, apple-filled center. That relaxed finish is part of the charm, making these a practical choice for a cozy morning, casual gathering, or sweet afternoon snack.
A dependable apple fritter waffle recipe begins with all-purpose flour, baking powder, and a small amount of salt. The flour provides structure, while baking powder helps the batter rise and gives the waffles a tender interior. Ground cinnamon adds familiar warmth; a pinch of nutmeg or allspice can provide a little extra spice. Sugar sweetens the batter and helps the surface brown. For moisture and richness, use an egg, milk or buttermilk, melted butter or a neutral oil, and vanilla extract. Finely diced apple is the defining addition, distributing fruit through each bite without weighing down the batter.
Choose firm apples that retain their shape as they cook. Granny Smith apples offer a tart contrast to the sweet batter, while Honeycrisp, Braeburn, and Pink Lady varieties provide balanced sweetness and a pleasantly crisp texture. Avoid pieces that are too large, since they may cook unevenly or make the waffles difficult to remove from the iron. A waffle iron is essential; a mixing bowl for dry ingredients and another for wet ingredients make preparation easier. Keep a whisk, measuring cups and spoons, and a flexible spatula nearby for combining and portioning the batter.
Begin by preheating the waffle iron according to its instructions, then lightly grease the cooking plates with oil or cooking spray, even if the appliance is nonstick. Wash, core, and finely dice the apple into small, even pieces so they soften at a similar rate. Measure each ingredient accurately, especially the flour and liquid, because an imbalanced batter may turn out dense or runny. Whisk the flour, baking powder, salt, sugar, and spices together in one bowl. In a second bowl, combine the egg, milk or buttermilk, melted butter or oil, and vanilla. Add the wet mixture to the dry ingredients and stir just until no large pockets of dry flour remain. Fold in the apples gently. Avoid vigorous or prolonged mixing: developing too much gluten can make the finished waffles tough rather than light and tender. Cook the batter promptly for the best texture and even browning.
Preheat the waffle iron fully before adding the apple fritter batter. A thoroughly heated surface helps the outside set quickly, encourages even browning, and reduces the chance of sticking. If the appliance has adjustable heat settings, choose a medium or medium-high setting as a starting point, then adjust based on the first batch. Lightly coat the grids with oil or melted butter if the manufacturer recommends it, or if you have noticed sticking. Use a brush or paper towel to apply only a thin layer; excess fat can smoke or make the surface greasy.
Spoon a modest portion of batter into the center of each waffle section, leaving space around the edges. The mixture spreads and expands as it cooks, so filling the iron to the rim can force batter out through the sides and create uneven, difficult-to-remove pieces. The ideal amount depends on the iron’s size and shape. Begin with less than you think you need, close the lid gently, and adjust the portion slightly on the next round if the finished fritters do not fill the grid.
Cooking time varies among waffle irons, so treat any recipe timing as a guide rather than a fixed rule. Look for deep golden-brown ridges, a crisp exterior, and a center that is cooked through. Pale or soft fritters usually need more time or a hotter, fully reheated iron. If pieces stick, avoid prying them loose; let them cook longer, and use a light coating of fat for subsequent batches if needed. For uneven browning, check that the batter is distributed across the cooking surface and allow the iron to recover its heat between batches. Opening the lid too early can tear the fritters or interrupt browning, so wait until they appear set and release more easily.
As each batch finishes, lift the fritters out carefully and place them in a single layer on a wire rack. Air can circulate around the pieces, helping their crisp surfaces stay firm while they cool. Avoid stacking them or covering them immediately: trapped steam softens the ridges and can make the exterior lose its crunch. If making several batches, keep finished fritters on the rack while the iron reheats, then serve them once they are golden and crisp.
For a simple donut-style glaze, whisk powdered sugar with milk a teaspoon at a time until the mixture is smooth and thick enough to coat a spoon. Add a small splash of vanilla for a familiar sweetness, or a pinch of cinnamon or nutmeg to echo the spices in the waffles. If the glaze becomes too thin, mix in more powdered sugar; if it is too thick to dip, loosen it with a few drops of milk. Let the apple fritter waffles cool briefly before glazing. Dip their tops into the bowl or drizzle the glaze across them, then set them on a rack until it firms. Waffles that are piping hot can melt the coating and make it run off.
Serve the waffles warm, while their edges are still crisp and the apple pieces are tender. Chopped toasted pecans or walnuts add crunch; sprinkle them over the glaze before it sets so they adhere. For a less sweet plate, offer fresh fruit on the side, such as berries or sliced pears. Coffee and tea are both suitable accompaniments, whether the waffles are served for breakfast, brunch, or an afternoon treat.
It is easy to adjust the flavor without changing the basic method. Increase or reduce the cinnamon, ginger, or nutmeg to suit your preference, or add a little finely grated lemon zest for a brighter note. A firm apple that holds its shape during cooking works best; try Granny Smith for tartness or Honeycrisp for a sweeter bite. Keep extra fruit, nuts, and other additions modest. Too much moisture or too many mix-ins can weigh down the batter and prevent the waffles from cooking evenly.
For make-ahead serving, cook the waffles and let them cool completely before storing leftovers in an airtight container. Keep them unglazed, since the coating can turn sticky in storage, and glaze individual portions just before serving. Reheat refrigerated waffles in a toaster or oven until hot and crisp. They can also be frozen once cooled; freeze them in a single layer first, then transfer to a sealed freezer-safe container. Reheat directly from frozen in a toaster or oven until the centers are hot and the outside has regained its crispness. Add glaze after reheating.