
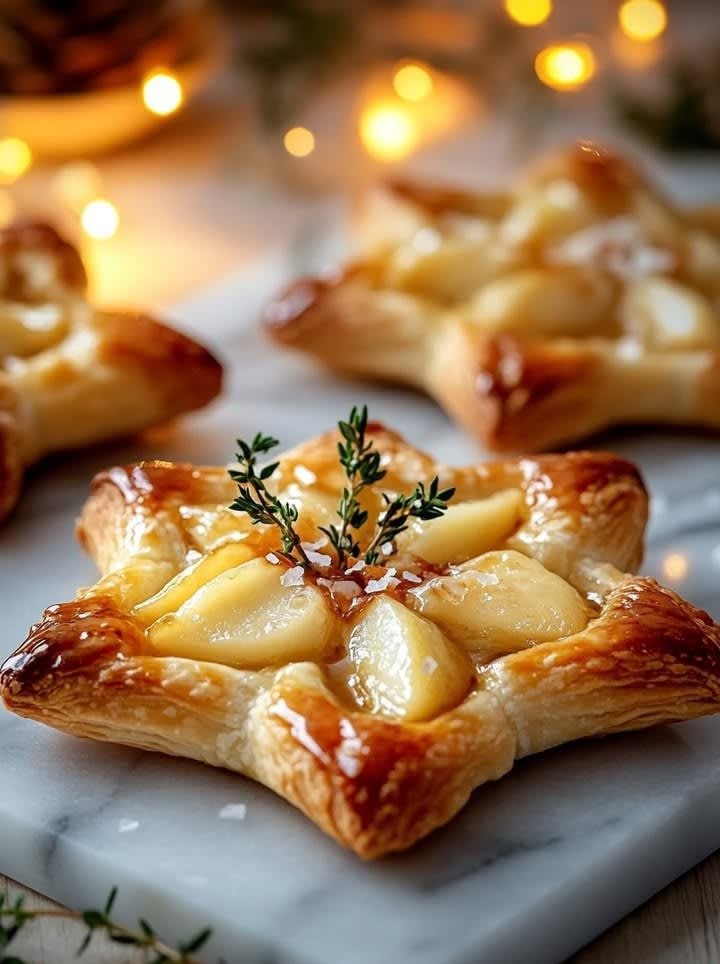
A golden pear and Brie puff pastry snowflake brings together familiar holiday flavors in a shape made to catch the eye. Its crisp, browned points fan across a serving platter, while the center reveals layers of pastry wrapped around warm, creamy cheese and sweet fruit. The result feels celebratory without requiring complicated techniques or hard-to-find ingredients. Because store-bought puff pastry does much of the work, this appetizer is approachable for home cooks preparing a larger holiday meal.
Each bite balances contrasting textures and tastes. Puff pastry bakes into delicate, buttery layers with a lightly crisp exterior, while Brie softens into a rich, creamy filling. Pear adds gentle sweetness and tender fruitiness; caramelizing it first deepens its flavor and helps bring out a mellow, almost honeyed quality. Together, the ingredients are indulgent but not overly heavy, with the fruit providing a fresh counterpoint to the cheese. The pastry’s golden finish and inviting aroma make it just as appealing before the first slice is served.
The snowflake form also makes sharing simple and sociable. Guests can pull away the pastry points, turning the centerpiece into an easy, hands-on appetizer rather than a dish that needs careful cutting. Its decorative appearance suits a festive table, whether served before dinner or alongside a spread of small bites. Pair it with sparkling wine for a crisp contrast, or offer apple cider and other seasonal drinks to complement the pear’s sweetness. To prepare it, caramelize the pears, layer them with Brie between sheets of puff pastry, shape the dough into a snowflake, and bake until puffed and deeply golden. With a little shaping and a hot oven, a handful of ingredients becomes a warm, shareable focal point for holiday gatherings.
Set out two sheets of puff pastry, thawed until cold but pliable. The sheets form the snowflake’s top and bottom layers, enclosing the filling and creating crisp, flaky petals as they bake. Avoid letting the pastry become warm or soft; chilled dough is easier to shape and is more likely to puff evenly in the oven. Use a little flour to prevent sticking while rolling, and line a baking sheet with parchment paper for easier baking and cleanup.
Choose ripe but firm pears that hold their shape when cooked. Overly ripe fruit can turn mushy and release excess liquid, making the pastry wet. A small amount of butter and brown sugar helps the pear slices soften, brown, and develop a gently caramelized sweetness. Brie provides a creamy, mild filling that complements the fruit. Its rind is edible and can be left on, or removed if a smoother texture is preferred. Cinnamon, fresh thyme, honey, and chopped nuts are optional additions; use one or two to add warmth, herbal notes, extra sweetness, or crunch without overwhelming the main flavors.
For the egg wash, beat one egg with a splash of water or milk. Brushing it over the pastry encourages a glossy, golden finish and helps the layers brown attractively. Gather a baking sheet, skillet for cooking the pears, pastry brush, and a sharp knife or pizza cutter for cutting the snowflake’s strips. A small round object, such as a cup or jar lid, can mark the center of the pastry and help guide the cuts.
Measure ingredients and prepare the optional additions before assembling the pastry. Slice the pears, cook them with the butter and brown sugar, and allow them to cool before adding them to the dough; hot filling can soften the pastry prematurely. Keep the Brie chilled until needed, and have the egg wash and tools within reach. This simple preparation makes assembly more orderly and helps preserve the distinct layers and shape of the finished holiday appetizer.
Begin by preparing the pears, since the filling needs time to cool before it meets the pastry. Peel and core the pears if desired, then slice them thinly and evenly so they soften at the same rate. Melt butter in a skillet over medium heat, add the pears and a little brown sugar, and cook, stirring gently, until the slices are tender, glossy, and lightly golden. A pinch of cinnamon adds warm spice, while a few leaves of fresh thyme offer a more savory note; either is optional. If the pears release a lot of juice, continue cooking until the liquid has mostly evaporated. Transfer the fruit to a plate and let it cool completely. Warm or wet filling can make puff pastry sticky and prevent it from rising evenly.
Place the first sheet of thawed puff pastry on parchment and roll it into an even circle, large enough to form the snowflake. Spread a thin layer of Brie in a ring around the center, leaving a clean border at the edge and a clear space in the middle. Arrange the cooled pear slices over the cheese without piling them up. Keep the filling modest: too much can leak through the cuts and make shaping difficult. Roll the second pastry sheet into a similar circle, lay it over the filling, and gently press around the outer edge to seal the two layers. Avoid pressing hard enough to flatten the pastry.
Set a small glass or round cutter in the center as a guide, but do not cut through the dough beneath it. With a sharp knife, cut from the guide’s outer edge toward the sealed perimeter, dividing the pastry into evenly spaced strips. Remove the glass, then twist each strip—or each neighboring pair—in the same direction to create defined snowflake points. Pinch the tips lightly so they hold their shape during baking. If the pastry feels warm, soft, or sticky at any point, transfer it to the refrigerator for a short chill before continuing. Finally, brush the surface with beaten egg, taking care not to let egg wash pool along the cut edges, where it may hinder the pastry’s rise.
Place the shaped pear and Brie puff pastry snowflake on a parchment-lined baking sheet and bake it in a fully preheated oven at about 400°F (200°C). Most versions need 20–30 minutes, though baking time varies with pastry thickness and oven performance. Avoid opening the oven repeatedly, which can interrupt the pastry’s rise. Begin checking near the 20-minute mark; the snowflake should be puffed and deep golden, with no pale, doughy areas.
Check the center as well as the outside edges, since the thicker middle may need extra time. If you can carefully lift an edge, look underneath for crisp, baked layers rather than a soft or damp base. When the pastry is done, let it rest on the sheet for several minutes before serving. This brief pause allows the melted Brie to settle, making the snowflake easier to pull apart without losing all the filling. Finish with a light drizzle of honey, fresh thyme leaves, or chopped toasted nuts, then serve warm as a shareable appetizer.
For an easier holiday schedule, caramelize the pears in advance and refrigerate them in a covered container. Assemble the snowflake shortly before baking; if the pastry softens while shaping, chill the completed design briefly so the butter firms up again. Bake close to serving time for the crispest layers, rather than baking far ahead and letting the pastry sit. Keep any prepared filling cool and avoid adding excess liquid, which can make the base soggy.
If cheese escapes during baking, it is usually still safe to serve; allow it to cool slightly and use a spatula to transfer the pastry. For uneven browning, rotate the baking sheet once during baking, provided the pastry has already risen and set. Refrigerate leftovers in an airtight container and reheat them in a moderate oven until warmed and crisp. The microwave may soften the pastry, so it is less suitable when preserving a flaky texture matters.