
This post may contain affiliate links, which means I might earn a small commission (at no extra cost to you) if you decide to make a purchase through one of these links. I only recommend products I actually use or genuinely believe will bring value. Thanks for the support!
TAP HERE TO GET ACCESS TO YOUR DIGITAL AIR FRYER
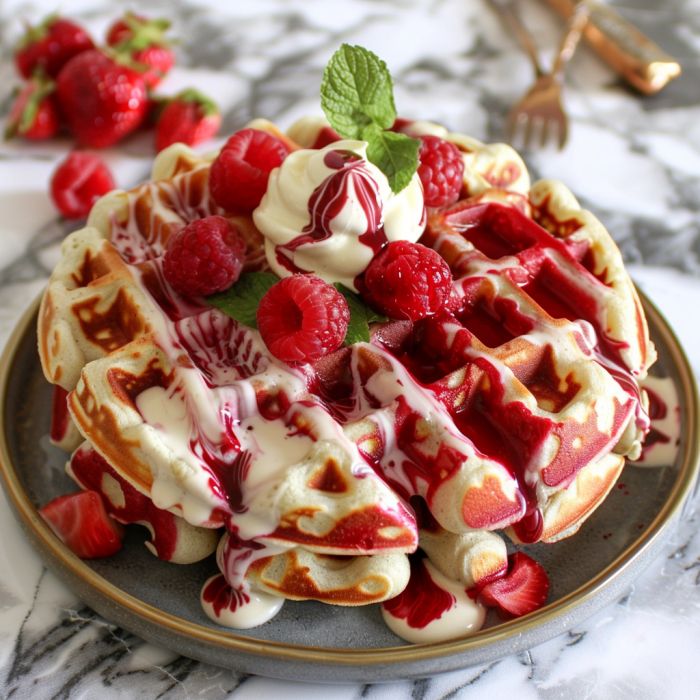
A Decadent Breakfast Treat That’s Beautiful, Bold, and Unforgettable
If you’re the kind of person who believes breakfast should be as exciting as dessert, you’re in the right place. Today, we’re talking about how to make Red Velvet Marbled Waffles—a stunning, swirled, sweet twist on the classic morning staple. With their deep red swirls and rich cocoa notes, these waffles aren’t just tasty—they’re a total showstopper.
Whether you’re hosting brunch, making something special for Valentine’s Day, or just want to treat yourself, these Red Velvet Marbled Waffles are guaranteed to impress. Best part? They’re surprisingly easy to make with ingredients you probably already have in your pantry.
Why You’ll Love These Red Velvet Marbled Waffles
Let’s face it—plain waffles are fine, but they don’t always scream “wow.” These marbled beauties, on the other hand, bring together the classic flavor of red velvet cake with the crisp, golden texture of Belgian waffles.
Here’s why you’ll be obsessed:
• Visually stunning: Perfect for Instagram or your Pinterest board.
• Rich cocoa flavor: A hint of chocolate takes them over the top.
• Customizable: Serve with cream cheese glaze, whipped cream, or fresh berries.
• Perfect for holidays and celebrations: Think Valentine’s Day, birthdays, or anniversaries.
TAP HERE TO GET ACCESS TO YOUR DIGITAL AIR FRYER
Ingredients You’ll Need
For the Basic Waffle Batter:
• 2 cups all-purpose flour
• 2 tablespoons granulated sugar
• 1 tablespoon baking powder
• ½ teaspoon baking soda
• ½ teaspoon salt
• 2 large eggs
• 1 ¾ cups buttermilk
• ⅓ cup vegetable oil or melted butter
• 1 teaspoon vanilla extract
For the Red Velvet Swirl:
• ¼ cup cocoa powder
• 2 tablespoons sugar
• 2 tablespoons buttermilk
• 1 tablespoon red food coloring (gel preferred for vibrant color)
• Optional: 1 teaspoon white vinegar (for classic red velvet tang)
TAP HERE TO GET ACCESS TO YOUR DIGITAL AIR FRYER
Step-by-Step Instructions
1. Make the Basic Waffle Batter
In a large mixing bowl, whisk together flour, sugar, baking powder, baking soda, and salt.
In a separate bowl, beat the eggs and mix in buttermilk, oil, and vanilla. Pour the wet ingredients into the dry ingredients and stir until just combined. Be careful not to overmix—lumps are okay!
2. Prepare the Red Velvet Mixture
In a small bowl, combine cocoa powder, sugar, buttermilk, red food coloring, and vinegar (if using). Stir until smooth. Then, fold about ¾ cup of the waffle batter into the red velvet mixture. This will become your marbling swirl.
3. Preheat Your Waffle Iron
Lightly grease your waffle iron and preheat according to the manufacturer’s instructions.
4. Create the Marble Effect
Pour plain waffle batter into the center of the iron. Add a few spoonfuls of the red velvet batter in a swirl pattern on top. Use a butter knife or skewer to gently swirl the two batters together—don’t overdo it!
5. Cook and Serve
Cook the waffles until golden and crispy. Serve warm with your favorite toppings like:
• Cream cheese glaze
• Powdered sugar
• Fresh strawberries or raspberries
• Whipped cream
• Chocolate chips or sprinkles
TAP HERE TO GET ACCESS TO YOUR DIGITAL AIR FRYER
Pro Tips for the Best Red Velvet Waffles
• Use gel food coloring for a richer red hue without thinning the batter.
• Don’t over-swirl. A light hand gives that beautiful marbled look.
• Keep them warm in a 200°F oven if making multiple batches for a crowd.
• Double the recipe if serving more than 4 people—these go fast!
Make It Healthier (Yes, Really!)
While these waffles are meant to be a treat, you can still tweak them for a healthier spin:
• Swap whole wheat flour for half of the all-purpose.
• Use Greek yogurt in place of some oil for added protein.
• Try natural food coloring like beet powder or pomegranate juice.
When to Serve Red Velvet Marbled Waffles
These waffles are an ideal centerpiece for:
• Valentine’s Day brunch
• Mother’s Day breakfast
• Birthday breakfast in bed
• Holiday mornings like Christmas or New Year’s Day
• Weekend brunch with friends
Storage and Reheating Tips
• To store: Let waffles cool completely. Place in an airtight container in the fridge for up to 3 days.
• To freeze: Wrap individually and store in freezer-safe bags for up to 2 months.
• To reheat: Pop in the toaster for a crispy finish or microwave for 30 seconds for a soft bite.
Final Thoughts: Sweet Swirls of Joy
If you’re looking to turn an ordinary morning into something magical, these Red Velvet Marbled Waffles are it. They’re bold, beautiful, and bursting with flavor. Plus, they’re easy enough for a weekend and impressive enough for a celebration.
Once you try these, you’ll never look at waffles the same way again.