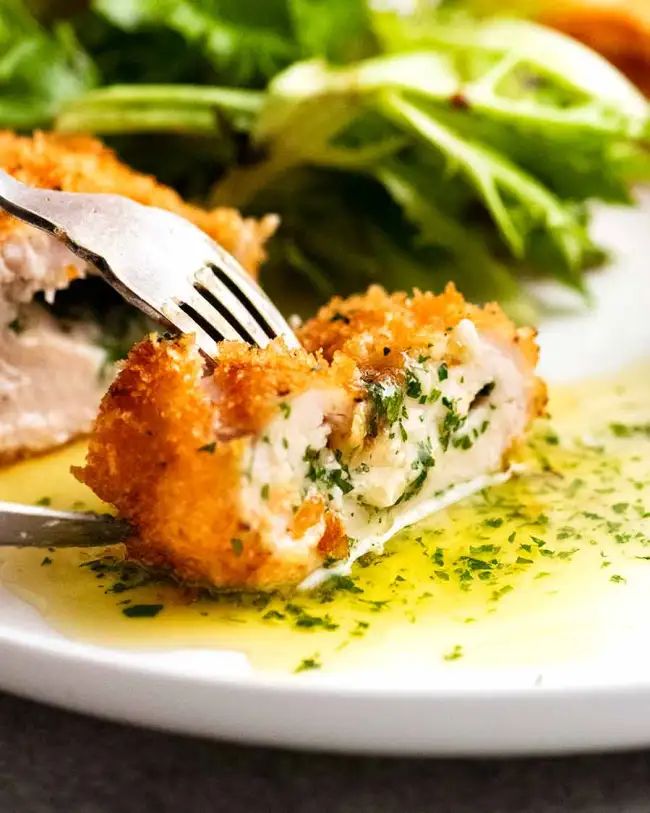
If you’ve ever wanted to impress your family or dinner guests with a crispy, buttery, flavor-packed dish, Chicken Kiev is your golden ticket. This classic Ukrainian-inspired recipe combines tender chicken breasts with an irresistible garlic herb butter center, wrapped in golden breadcrumbs. It might sound fancy, but trust me — you can absolutely make this at home, even if you’re not a pro in the kitchen!
In this post, you’ll learn how to make Chicken Kiev step-by-step, what ingredients you’ll need, essential tips for success, and why this dish is totally worth mastering.
🥄 What is Chicken Kiev?
Before diving into the how-to, let’s clarify what Chicken Kiev actually is.
Chicken Kiev is a dish made of chicken breast pounded thin, stuffed with a cold log of garlic herb butter, then breaded and fried (or baked) until golden and crispy. The moment you cut into it, a luxurious stream of melted butter pours out — and that’s exactly what makes this dish so iconic.
Whether you’re planning a cozy family dinner or a special date night, Chicken Kiev brings an element of surprise, comfort, and elegance to the table.
🍗 Ingredients for Homemade Chicken Kiev
Before you start cooking, gather these ingredients:
For the Garlic Herb Butter Filling:
• ½ cup unsalted butter, softened
• 2 cloves garlic, minced
• 2 tbsp fresh parsley, finely chopped
• 1 tbsp fresh dill or chives (optional)
• ½ tsp salt
• ¼ tsp black pepper
• Zest of half a lemon (optional but recommended)
For the Chicken:
• 4 boneless, skinless chicken breasts
• Salt and pepper to taste
• ½ cup all-purpose flour
• 2 large eggs, beaten
• 1 cup breadcrumbs (panko for extra crunch)
• Vegetable oil for frying
🔪 Step-by-Step: How To Make Chicken Kiev
Step 1: Make the Garlic Butter
In a bowl, combine the softened butter, garlic, herbs, salt, pepper, and lemon zest. Mix thoroughly.
Place the butter mixture on plastic wrap and roll it into a tight log, about 4 inches long. Chill in the freezer for 20–30 minutes or until solid. This step is crucial — cold butter stays intact during prep and melts beautifully when cooked.
Step 2: Prepare the Chicken
Butterfly the chicken breasts by slicing them horizontally without cutting all the way through. Open like a book and cover with plastic wrap. Gently pound with a meat mallet until about ¼-inch thick.
Season both sides with salt and pepper.
Step 3: Stuff and Roll
Place a piece of frozen garlic butter in the center of each chicken breast. Fold in the sides and tightly roll the chicken into a log, securing with toothpicks if needed. Chill in the fridge for 15–20 minutes to help them hold shape.
Step 4: Bread the Chicken
Set up a breading station with three bowls: flour, beaten eggs, and breadcrumbs.
Dredge each chicken roll first in flour, then dip in egg, and finally coat in breadcrumbs. For an extra crispy crust, repeat the egg and breadcrumb step one more time.
Step 5: Cook Until Golden
In a deep skillet, heat oil to 350°F (175°C). Carefully lower each Chicken Kiev into the oil and fry for 4–5 minutes per side, until golden and crisp.
Transfer to a baking tray and finish in a preheated oven at 375°F (190°C) for about 15 minutes to ensure the chicken is fully cooked.
🧄 Pro Tips for the Perfect Chicken Kiev
• Don’t skip chilling: Keeping the butter and chicken cold helps prevent leaks.
• Double-coat for crunch: A second coating of breadcrumbs makes all the difference.
• Test doneness: Internal temperature should reach 165°F (74°C).
• Let it rest: Rest 5 minutes before serving to keep that buttery center intact.
🍽 What To Serve With Chicken Kiev
Here are some perfect pairings:
• Creamy mashed potatoes
• Steamed green beans or asparagus
• A fresh lemony arugula salad
• Rice pilaf or garlic butter noodles
A drizzle of lemon juice on top just before serving takes it to another level!
🧡 Why You’ll Fall in Love With This Dish
Chicken Kiev is more than just a chicken recipe — it’s a showstopper. It combines:
• Crunchy texture from the breadcrumbs
• Juicy, tender chicken
• Rich, flavorful garlic butter
• A wow-worthy presentation
Even better, it’s versatile. You can make it ahead, freeze it for later, and customize the herb butter with your favorite flavors (think rosemary, tarragon, or even a bit of grated Parmesan).
🔁 FAQs About Chicken Kiev
Q: Can I bake Chicken Kiev instead of frying?
Yes! You can bake at 400°F (200°C) for 30–35 minutes, flipping halfway. Spritz with oil for a golden finish.
Q: Can I freeze Chicken Kiev?
Absolutely. Freeze uncooked Kievs after breading. When ready to cook, fry or bake straight from frozen—just extend the cook time.
Q: How do I keep the butter from leaking out?
Chill the butter, seal the chicken tightly, and double-coat in breadcrumbs.
📌 Final Thoughts
Once you master how to make Chicken Kiev, you’ll be hooked. It’s elegant yet comforting, fancy yet familiar. And that moment when the garlic butter spills out? Pure magic.
Whether it’s a weekend treat or a dish to impress guests, this recipe will quickly become a household favorite. Give it a try, and don’t forget to snap a photo when you cut it open — trust me, it’s Pinterest gold.
