
Looking for a unique twist on a classic Southern dessert? Learn how to make Blue Velvet Cake that’s ultra-moist, rich, and topped with dreamy cream cheese frosting. Whether it’s for birthdays, weddings, or just because—it’s guaranteed to impress.
A Southern Classic With a Bold New Look
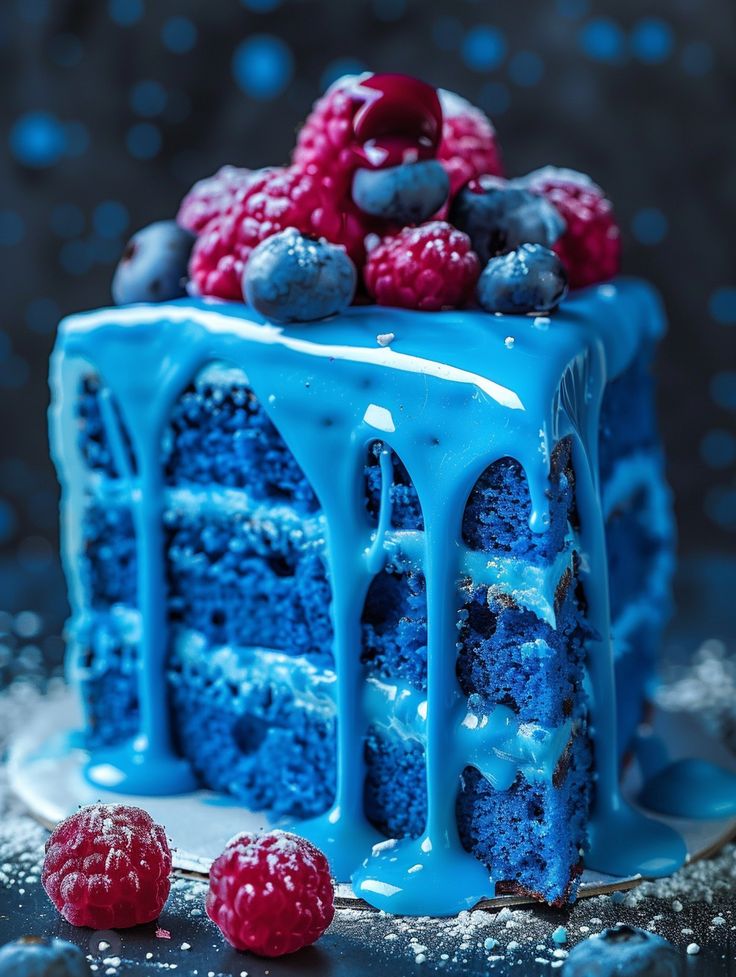
You’ve probably heard of red velvet cake—a staple at potlucks, family reunions, and Sunday dinners. But have you tried its mysterious and mesmerizing cousin? The Blue Velvet Cake is not just a pretty face. It has the same irresistible cocoa flavor, soft crumb texture, and tangy frosting—just with a brilliant blue hue that makes any celebration unforgettable.
So whether you’re a velvet cake fanatic or just exploring colorful bakes, this guide on how to make blue velvet cake will walk you through everything, step-by-step.
Why Blue Velvet Cake?
Let’s be real—food that looks as good as it tastes is always a hit. And blue velvet cake checks both boxes. Here’s why it’s worth baking:
• Eye-catching appearance: That rich blue is a showstopper.
• Perfectly moist: Thanks to buttermilk and oil in the batter.
• Just enough chocolate: A hint of cocoa gives that classic velvet cake flavor.
• Crowd-pleaser: Ideal for baby showers, birthdays, or themed parties.
• Customizable: You can bake it as a sheet cake, layer cake, or even cupcakes!
Ingredients You’ll Need
To get that signature blue velvet flavor and texture, you’ll want to gather the following:
Dry Ingredients:
• 2 ½ cups all-purpose flour
• 1 ½ cups granulated sugar
• 1 tbsp unsweetened cocoa powder
• 1 tsp baking soda
• ½ tsp salt
Wet Ingredients:
• 1 cup vegetable oil
• 2 large eggs
• 1 cup buttermilk
• 2 tsp vanilla extract
• 1 tbsp white vinegar
• 1 to 2 tbsp royal blue food coloring (gel-based works best)
For the Cream Cheese Frosting:
• 8 oz cream cheese, softened
• ½ cup unsalted butter, softened
• 3 ½ cups powdered sugar
• 1 tsp vanilla extract
• Pinch of salt
Step-by-Step: How To Make Blue Velvet Cake
1. Preheat and Prep
Start by preheating your oven to 350°F (175°C). Grease and flour two 9-inch round cake pans or line with parchment paper.
2. Combine the Dry Ingredients
In a large bowl, sift together flour, sugar, cocoa powder, baking soda, and salt. This step helps avoid clumps and gives the cake a light, airy texture.
3. Mix the Wet Ingredients
In another bowl, whisk together the oil, eggs, buttermilk, vanilla, vinegar, and blue food coloring. Stir until everything is completely combined and a rich blue color develops.
Tip: Start with 1 tablespoon of food coloring. Add more if you want a deeper hue.
4. Combine Wet and Dry Mixtures
Gradually mix the wet ingredients into the dry mixture using a hand mixer or stand mixer on low speed. Scrape down the sides to ensure even mixing, but don’t overmix—just until everything is smooth.
5. Pour and Bake
Evenly divide the batter between your cake pans. Tap them lightly on the counter to remove air bubbles. Bake for 25–30 minutes or until a toothpick inserted in the center comes out clean.
Let the cakes cool in the pans for 10 minutes, then remove and transfer to wire racks to cool completely.
Let’s Talk Frosting
While your cake layers cool, whip up the delicious cream cheese frosting.
• Beat the softened butter and cream cheese together until fluffy.
• Gradually add powdered sugar, vanilla, and a pinch of salt.
• Beat until creamy and smooth.
Time To Assemble
Once your cake layers are completely cool:
• Place one layer on a cake stand.
• Add a generous scoop of frosting and spread evenly.
• Place the second layer on top and repeat.
• Frost the top and sides of the cake.
• Optional: Garnish with white chocolate curls or fresh berries for a stunning finish.
Tips To Nail Your Blue Velvet Cake
✅ Use gel food coloring – It gives a more vibrant blue and won’t water down your batter.
✅ Don’t skip the vinegar – It reacts with baking soda to give the cake its fluffy rise.
✅ Refrigerate before slicing – It helps the frosting set and makes cleaner cuts.
Variations To Try
• Cupcakes: Same recipe, just bake for 18–20 minutes.
• Blue Ombre Cake: Use decreasing amounts of coloring in each layer.
• Holiday Twist: Mix blue with white and red layers for a patriotic dessert.
Storing and Serving
• Store in the fridge for up to 5 days in an airtight container.
• Freeze unfrosted cake layers for up to 2 months—wrap tightly in plastic wrap and foil.
Serve chilled or at room temperature. Trust me—every bite is melt-in-your-mouth magic.
Final Thoughts: Why This Recipe Deserves a Spot in Your Baking Rotation
There’s something magical about velvet cakes—the smooth texture, the subtle cocoa flavor, and that rich frosting. The blue version adds a stunning visual twist that elevates it to a whole new level. Learning how to make blue velvet cake gives you a wow-worthy dessert you can whip up anytime you want to dazzle.
Whether you’re celebrating a baby boy on the way, planning a winter-themed party, or simply want to shake things up in the kitchen—this is your new go-to cake recipe.