
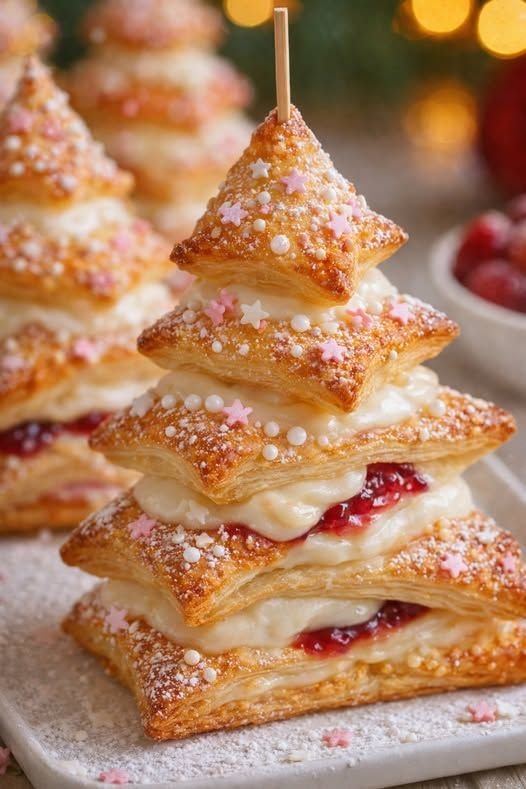
A cream-and-jam puff pastry tree brings festive color and inviting flavor to the holiday table, while remaining refreshingly simple to prepare. Layers of pastry bake into a crisp, golden centerpiece shaped like a Christmas tree, giving it a special-occasion appearance without demanding advanced pastry skills. The familiar ingredients and straightforward assembly make this dessert approachable for home cooks, whether they are hosting a large celebration or adding one cheerful touch to a smaller seasonal gathering. Its shape also makes it easy to place at the center of a dessert spread, where guests can admire it before serving.
Each slice offers a pleasing contrast of textures and tastes: buttery, flaky pastry surrounds smooth cream and bright, fruity jam. The filling adds color between the layers, creating an appealing finish when the tree is cut or pulled apart. Choose a classic berry preserve for a familiar sweet-tart note, or select another favorite jam to complement the cream. A light dusting of sugar can suggest a snowy finish, while fresh berries or a few carefully chosen decorations add further holiday charm. The result feels celebratory yet relaxed, balancing an impressive presentation with flavors that are easy to enjoy.
This versatile pastry suits many festive occasions, from family gatherings and holiday brunches to office parties and seasonal buffets. It can be prepared as a shareable centerpiece, then served in portions that guests can pick up and enjoy without elaborate plating. The tree also makes a thoughtful edible gift: bake it for a host, bring it to a potluck, or package individual portions for friends and neighbors. Because the filling is flexible, the recipe can be adapted to different tastes and dietary needs. Try alternative jams, adjust the sweetness, or use suitable dairy-free ingredients where appropriate. With a little planning and a few readily available components, this golden pastry turns a simple combination of cream and fruit into a memorable part of the holiday celebration.
Ready-rolled puff pastry provides the crisp, golden layers that give a Christmas pastry tree its distinctive shape and light texture. Choose pastry sheets that are large enough to cut into matching tree shapes, and check the package instructions for thawing and baking. The cream filling adds richness and a soft contrast to the flaky pastry. Use a thick, stable filling, such as sweetened whipped cream stabilized with mascarpone, or another firm cream-based mixture. A loose filling can spread during assembly or baking, so keep it chilled and avoid adding more than the pastry can hold. Jam contributes fruity flavor and bright festive color. Raspberry and strawberry offer vivid red tones, while apricot brings a milder sweetness and golden hue. Whichever variety you choose, select a thick jam rather than a runny preserve to help limit leakage.
Gather the equipment before starting so the pastry can be assembled quickly while it remains cool. A flat baking tray provides a stable surface, and parchment paper makes it easier to transfer, bake, and lift the finished tree. Use a sharp knife or pizza cutter to trim the pastry into even shapes and make clean cuts for the branches. A pastry brush is useful for applying egg wash, if the recipe calls for it, while a piping bag gives more control when adding cream. A spoon is a simple alternative for spreading or portioning the filling, provided it is used gently and evenly.
Follow the pastry package directions when thawing, but keep the sheets cool rather than letting them become soft and sticky. If the pastry warms too much, the layers may be harder to handle and may not rise as well. Preheat the oven fully before assembly, allowing it to reach the recipe’s stated temperature. Line the baking tray with parchment and make sure it fits inside the oven. Prepare the cream filling in advance and refrigerate it until needed; chilled filling is easier to pipe or spread and less likely to soften the pastry. Set out the jam, tools, and cut pastry shapes before layering, then work efficiently and return the assembled tree to the refrigerator briefly if it becomes warm before baking.
Set one sheet of chilled puff pastry on a baking tray lined with parchment. Using a sharp knife, cut a broad Christmas tree shape, tapering toward the top and leaving a short, sturdy trunk at the base. Keep the outline simple so the branches are easy to shape. If you like, retain the offcuts to make small stars or other decorations; avoid gathering and rerolling scraps too much, as this can reduce their flaky rise. Spread a thin, even layer of jam and cream over the tree, stopping just short of the edges. A narrow uncovered border helps the pastry sheets seal together and limits filling leakage during baking.
Place the second pastry sheet over the filled base, aligning it carefully. Trim around the tree so both layers match, pressing the edges gently to join them. With a knife, cut horizontal strips into each side to form branches, leaving an uncut central section running from the top to the trunk. Keep the strips similar in width, then twist each one gently, usually once or twice, to expose the pastry layers without pulling the branches away from the center. Press together any edges that have opened, taking care not to squeeze filling out. Arrange pastry stars or other shapes made from the reserved scraps on the tree, attaching them with a little water if needed.
Brush the exposed pastry lightly with beaten egg for a glossy, deep-golden finish, or use milk for a subtler sheen. Keep the wash off the tray and avoid letting it pool in the cuts, where it may hinder the layers from separating. Bake according to the pastry package guidance, since oven temperatures and timings vary by brand and thickness. The tree is ready when it has risen, feels crisp, and is deeply golden across the branches and center. If the tips brown before the middle is baked, loosely cover them with foil and continue baking. Transfer the pastry to a rack and let it cool before adding delicate finishing touches, such as powdered sugar or fresh berries, so they remain neat and do not melt into the warm cream.
For a festive finish, dust the baked puff pastry tree lightly with icing sugar just before serving. The fine coating creates a snowy effect without hiding the golden layers. A few fresh berries, such as raspberries or cranberries, add colour, while small edible decorations can make the tree feel especially celebratory. Serve it warm, when the pastry is at its crispest, or at room temperature if preparing a buffet. Offer extra jam, sliced fresh fruit, or a small bowl of softly whipped cream alongside, so guests can add a little more sweetness as they wish.
Filled puff pastry is best enjoyed soon after baking, while its layers remain crisp and flaky. For a different flavour, replace the jam with chocolate spread, citrus curd, or another fruit preserve. Chopped nuts can add crunch, and a lightly spiced cream filling can bring notes of cinnamon or cardamom. Keep additions modest and avoid ingredients that are overly wet: excess moisture may soften the pastry or make the shaped tree difficult to handle. If using fruit, choose small pieces and pat them dry before adding them to the filling.
For the best texture, assemble the tree shortly before baking whenever possible. If the shaped pastry becomes soft or warm while you work, refrigerate it briefly until firm, then bake according to the recipe. This short chill helps the layers hold their shape in the oven. Store any leftovers in an airtight container once fully cool, and eat them within a day or two for the best quality. To revive softened pastry, warm it gently in a low oven until crisp. Avoid the microwave, which can make the layers chewy. If preparing components ahead, keep the filling covered and chilled, then assemble and bake close to serving time.