
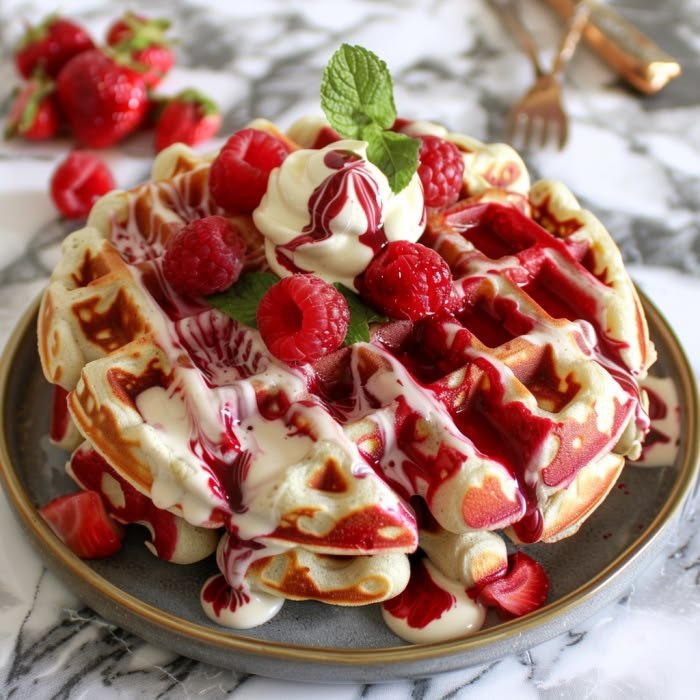
Red velvet marble waffles bring the familiar appeal of a crisp, warm breakfast together with the distinctive look and gentle cocoa flavor of red velvet cake. Their deep red and pale golden swirls make each waffle feel special before it reaches the table, while the taste remains balanced rather than dessert-sweet. A little cocoa adds a soft, rounded note, complementing the buttery richness of the batter without turning the waffles into chocolate cake.
The signature pattern comes from preparing two batters: one lightly colored and one tinted red. Instead of mixing them until uniform, you spoon both into the waffle iron and draw them together with just a few gentle strokes. The colors remain distinct, forming irregular ribbons and patches that vary from waffle to waffle. This simple technique creates a striking marbled finish without requiring elaborate decorating skills or special equipment beyond a standard waffle maker.
Texture is just as important as appearance. A well-made waffle develops crisp edges against the hot iron while staying tender and fluffy in the center. The contrast gives each bite a satisfying structure, and the subtle cocoa flavor keeps the sweetness in check. Serve the waffles plain to appreciate their color and flavor, or add a modest topping such as whipped cream, fresh berries, or a drizzle of maple syrup. Richer toppings can also work, but a light hand allows the red velvet character to remain clear.
Although the finished waffles look impressive, the method is approachable for a weekend breakfast or a celebratory brunch. The batters can be mixed with ordinary pantry ingredients, and the marbling depends more on restraint than precision: overmixing erases the pattern, while a few loose swirls preserve it. Expect each waffle to look slightly different, with its own red-and-cream design. That variation is part of the charm, making a familiar breakfast feel festive while keeping the preparation practical and the flavors comfortably recognizable.
All-purpose flour provides the waffles’ structure, while baking powder—or a combination of baking powder and a small amount of baking soda—helps them rise and stay fluffy. Salt balances the sweetness and brings out the chocolate and vanilla notes. Granulated sugar adds sweetness and encourages browning, and eggs bind the ingredients while contributing richness. Melted butter gives the batter tenderness and flavor; vanilla rounds out both varieties.
Milk creates a pourable batter, but buttermilk is especially useful for red velvet waffles. Its acidity gently tenderizes the crumb and adds a mild tang that complements the cocoa. If buttermilk is unavailable, combine regular milk with a little lemon juice or white vinegar, then let it stand for several minutes before using. Keep the cocoa powder modest: a small amount supplies red velvet’s characteristic background flavor without making the waffles taste strongly of chocolate.
To make two batters, first whisk the dry ingredients together and prepare a light vanilla mixture with the eggs, milk or buttermilk, melted butter, and vanilla. For the most even result, mix one base batter, then divide it into two portions. Stir vanilla into one portion. In the other, blend in the cocoa powder and red food coloring, mixing only until the color is uniform. Alternatively, prepare the red portion separately, measuring ingredients carefully so the two mixtures remain alike.
Both batters should have a similar thickness—soft and spoonable, but still easy to pour. If the cocoa makes the red velvet mixture noticeably thicker, add milk a teaspoon at a time; if it is thinner, a small pinch of flour can help. Gel or liquid red food coloring both work, though gel often gives strong color with less added moisture. Beet powder or concentrated beet juice can provide a natural alternative, but the shade may be less vivid and can shift during cooking. Avoid overmixing either batter, since excess stirring can make the finished waffles dense.
Begin by preheating the waffle iron according to its manufacturer’s instructions. A fully heated surface helps the batter cook evenly and encourages crisp, golden edges. Lightly grease the plates with a small amount of neutral oil or nonstick spray, even if the appliance has a nonstick coating. Use only enough to create a thin film; excess grease can pool around the waffles and interfere with their texture. Keep the two batters nearby, along with a spoon and a skewer or thin knife, so you can work quickly once the iron is ready.
Mix the wet and dry ingredients separately if the recipe calls for it, then combine them with a gentle hand. Stir only until the dry streaks mostly disappear. A few small lumps are perfectly acceptable and help prevent overmixing, which can make waffles dense or chewy. If the recipe includes a red velvet batter and a contrasting plain batter, keep each mixture in its own bowl. Avoid beating either one smooth; a tender waffle depends on handling the batter lightly.
Spoon alternating portions of each batter onto the center of the hot iron, leaving space for the mixture to spread as the lid closes. For a distinct marble pattern, drag a skewer or the tip of a knife through the batters in just a few gentle passes. Stop while the colors remain visibly separate. Too much swirling blends them into a single shade and removes the striking ribbons that make marble waffles appealing. Close the lid carefully, then cook according to the appliance’s indicator and the recipe’s timing guidance. Resist opening the iron repeatedly, since releasing heat can interrupt cooking and cause the waffle to tear or stick.
The waffles are ready when they feel set, smell fragrant, and have crisp edges; exact timing varies by iron and batter. Transfer each cooked waffle to a wire rack rather than stacking it on a plate, where trapped steam can soften the surface. To keep the batch warm and crisp while you cook the rest, place the rack in a low oven, around 200°F (95°C). Arrange waffles in a single layer and leave them uncovered until serving. Add toppings just before bringing them to the table, so sauces and fruit do not soften the crisp exterior prematurely.
For serving these waffles, choose toppings that echo their cocoa notes and gentle tang without masking the vanilla and red velvet flavor. A thin cream cheese glaze is a natural match; drizzle it lightly over warm waffles so the swirls remain visible. Whipped cream adds softness, while fresh strawberries, raspberries, or blueberries bring brightness and a little acidity. Maple syrup offers familiar sweetness, and a light dusting of powdered sugar keeps the finish simple.
For balance, start with one topping and add more only if needed; rich glaze and generous syrup together can make the waffles overly sweet. A small bowl of berries served alongside lets diners adjust each bite. For a deeper chocolate profile, increase the cocoa modestly, tasting the batter as you go because extra cocoa can mute sweetness and deepen color. Mini waffles are useful for brunch platters or sharing, and cook quickly, so watch them.
To make a less-sweet version, reduce the sugar slightly rather than removing it entirely; sugar supports browning and helps preserve a tender texture. Keep the red coloring and cocoa balanced, then serve with fruit or a lightly sweetened topping. Refrigerate leftover waffles in an airtight container once fully cool, separating layers with parchment if stacking. They keep well for about three days. For longer storage, freeze them in a single layer first, then transfer to a sealed freezer bag.
Reheat chilled or frozen waffles in a toaster until hot and crisp; arrange them on a rack in an oven so air circulates. Avoid microwaving, since it can soften the edges. For an efficient morning, measure and combine the dry ingredients in advance, storing them covered at room temperature. Mix wet ingredients separately, but combine the batters shortly before cooking; freshly mixed batter gives the fluffiest waffles and the clearest marble pattern.