
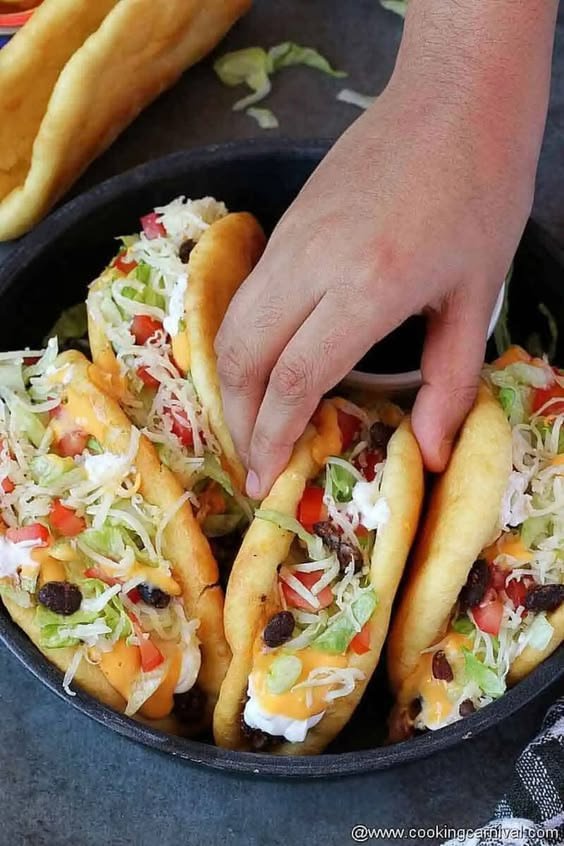
A chalupa may look like a taco, but its shell gives it a distinct texture. A standard taco is usually filled in a crisp, pre-shaped corn shell or a soft tortilla. A chalupa starts with a thicker flatbread that is folded while still pliable, then briefly fried. The hot oil turns the outside golden and lightly crisp while the inside stays soft and tender. That contrast is central to a Taco Bell–style chalupa and makes the shell substantial enough to hold a generous filling.
The recipe brings together a warm flatbread shell, seasoned ground beef, shredded lettuce, diced tomato, shredded cheese, and sour cream. You can make the shells from scratch or use suitable store-bought flatbread as a shortcut. Homemade dough offers control over thickness and freshness, while ready-made options can simplify preparation. Either way, the shell should be flexible enough to fold and sturdy enough to support the toppings after frying.
For homemade shells, gather all-purpose flour, baking powder, salt, and a small amount of fat, such as shortening or oil. Warm milk or water brings the dough together; milk can add tenderness, while water keeps the dough simple. The beef filling needs ground beef and taco seasoning. For a from-scratch blend, use chili powder, cumin, paprika, garlic powder, onion powder, and salt, adjusting the proportions to suit your preferred level of spice.
The toppings are flexible rather than fixed. Add or omit ingredients according to taste, or include extras such as hot sauce, jalapeños, or a favorite salsa. Prepare the lettuce, tomato, cheese, sour cream, and any additional toppings before you fry the shells. Once fried, the flatbreads are best filled promptly while warm, so having everything measured and within reach makes assembly easier and helps preserve the contrast between crisp edges and a tender center.
Set a large skillet over medium heat and add the ground beef, breaking it apart with a wooden spoon or spatula as it begins to cook. Work the meat into small, even crumbles so it browns consistently and is easy to distribute inside each chalupa. Stir and break up larger pieces frequently, cooking until no pink remains and the beef is browned throughout. Avoid rushing the process with high heat, which can cause the outside to brown before the meat has separated into fine crumbles.
If the beef releases a noticeable amount of fat, carefully drain off the excess, leaving a little behind to help carry the seasoning. Sprinkle in taco seasoning, either from a packet or a homemade blend, and add a small amount of water—usually a few tablespoons, or the quantity specified on the seasoning package. Stir thoroughly so the spices coat the meat instead of clumping in one area. The water helps create a lightly saucy filling that stays moist inside the crisp, pillowy shells.
Bring the mixture to a gentle simmer, then cook for a few minutes, stirring occasionally, until most of the liquid has reduced. The beef should look glossy and well seasoned, not dry or watery. Taste a small spoonful and adjust the seasoning if needed. A homemade spice blend gives you control over the salt level and heat, making it easy to tailor the flavor to your preference. A packaged seasoning mix is a convenient shortcut when you want to keep preparation simple; if using one, check its salt content before adding extra salt.
Once the filling is ready, reduce the heat to low and keep the beef warm while you prepare the chalupa shells. Stir it occasionally, adding a splash of water if it begins to dry out. You can also cook the beef ahead: cool it promptly, refrigerate it in a covered container, and reheat it gently in a skillet with a little water. Keeping the filling warm and moist makes assembly easier and helps each finished chalupa taste freshly prepared.
Whisk the flour, baking powder, and salt together in a large bowl so the leavening is evenly distributed. Work in the shortening or neutral oil with your fingertips or a fork until the mixture looks crumbly, with no large pieces of fat remaining. Gradually pour in warm milk or water, mixing as you go, until a soft dough forms. You may not need every drop; stop when the dough comes together and feels pliable rather than sticky. If it is dry or cracks as you press it, add a little more liquid, one teaspoon at a time.
Knead the dough briefly on a lightly floured surface, just until smooth; overworking it can make the shells tough. Cover and let it rest for about 20 minutes. Resting relaxes the dough, making it easier to roll without springing back. Divide it into equal portions and shape each into a ball. Roll each portion into a thick round, approximately ¼ inch thick. Keep the rounds thicker than ordinary tortillas: this gives the finished chalupa shell a tender interior while allowing its surface to become golden and crisp.
Pour a shallow layer of neutral oil into a sturdy skillet and heat over medium until shimmering, but not smoking. Fry one round at a time, turning it as needed, until both sides are lightly golden and blistered. Adjust the heat if the dough browns too quickly or the oil begins to smoke. Avoid overcrowding the pan, which can lower the oil temperature and make the shells greasy. While each round is still warm and pliable, gently fold it into a taco shape; use tongs to hold it briefly if needed. Let it finish crisping enough to keep its form, then drain on a wire rack or paper towels. For a faster option, fry thick store-bought flatbread and fold it while warm. It saves preparation time, but homemade dough gives the closest tender, slightly crisp texture.
As soon as the chalupa shells are fried and still warm, fill them while their outsides remain crisp and their centers tender. Spoon seasoned beef into each shell first, spreading it along the bottom rather than packing it tightly. Add shredded lettuce, diced tomato, shredded cheese, and a modest spoonful of sour cream. Use manageable portions: overfilling can make the shell difficult to hold, cause toppings to spill, and weigh down the delicate crisp exterior. If preparing several servings, keep the finished shells warm in a low oven while you assemble them, but avoid stacking them, which can trap steam and soften the crust.
Customize the toppings to suit different preferences. Refried beans can replace some of the beef or provide a satisfying meat-free option; add them warm in a thin layer so the shell stays easy to bite. For more heat, include sliced jalapeños or a few drops of hot sauce, adding gradually and tasting as you go. To keep the chalupas mild, omit spicy toppings and choose a gentle salsa, or serve hot sauce on the side so everyone can adjust their own portion. Cheddar, Monterey Jack, or a Mexican-style blend can stand in for the usual shredded cheese, bringing a slightly different flavor and melt. Keep extra toppings available at the table for individual customization.
Serve chalupas immediately after filling for the best contrast between the crunchy exterior and soft, tender interior. If you expect leftovers, store the shells separately from the beef and fresh toppings; lettuce, tomato, and sour cream release moisture that can quickly make the crust soggy. Refrigerate cooked beef and other perishable fillings promptly in covered containers, following food-safety guidance, and use them within a few days. Reheat the shells by themselves in an oven or air fryer until warmed and crisp again, then add the chilled or freshly prepared toppings. A microwave heats quickly but tends to soften the shell, so reserve it for reheating the filling alone. Assemble only what you plan to eat, and keep remaining components separate until serving.